1. Altibase 서버 리눅스에 설치하기
-설치전 준비사항-
ALTIBASE를 설치하기 전에 설치파일 및 LICENSE 파일을 미리 준비해 두도록 한다.
-설치파일 다운로드-
다운로드 경로 : http://support.altibase.com/kr/
다운로드 탭에서 제품을 선택하여 제품을 다운로드 받을 수 있다.
CentOS에 설치하기 위해 Linux-X86-64bit 제품을 선택하여 다운로드 받는다.
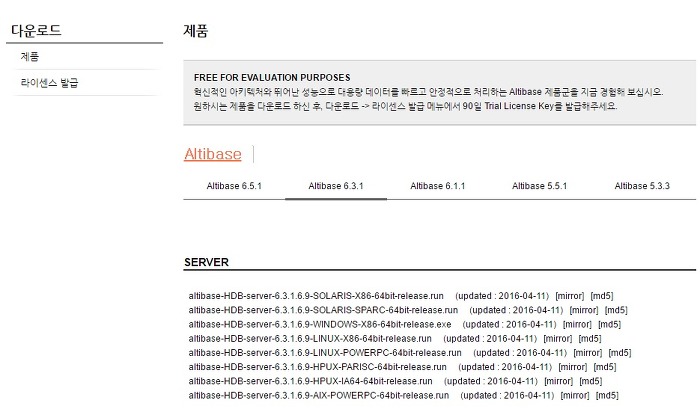
기존에 존재하는 유지보수 알티베이스의 버전에 맞추기 위해서
2018-01-13일 6.1.1 현 시점에서 가장 낮은 버전으로 설치했다.
1. 리눅스에 설치할 server
2. 윈도우 클라이언트에 설치할 client
3. tool
위 3가지 모두 필요하며 순서데로 설치해야 한다.
알티베이스 설치 가이드 사이트 : http://aid.altibase.com/pages/viewpage.action?pageId=7340862
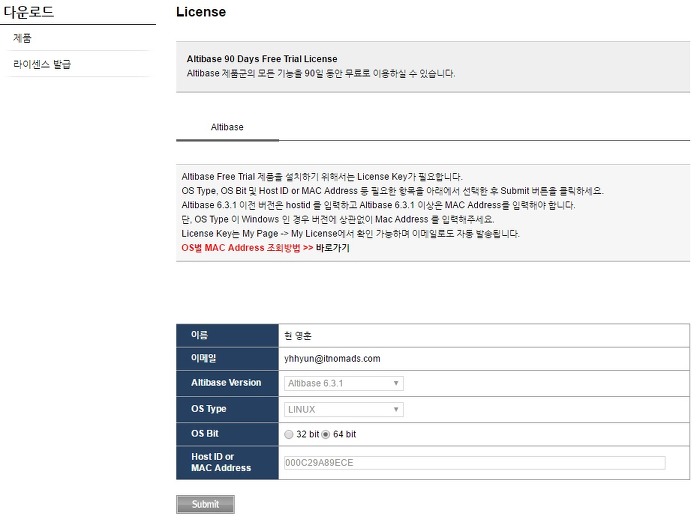
-라이센스 발급-
임시 라이센스는 support.altibase.com에서 회원가입 후 받을 수 있다.
회원가입 후 다운로드탭의 [라이센스 발급] 창에서 발급을 진행한다.
ALTIBASE 6.3.1 버전은 Mac Address를 확인하여 발급받아야 하며 설치할 서버의 Mac Address 확인 방법은 다음과 같다.
라이센스 발급을 받아서 해야 한다.
altibase 키 생성기 사이트가 있어서 시도를 해 봤는데 안 된다.
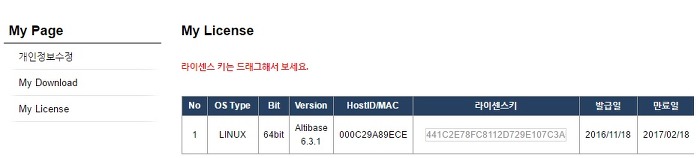
[root@ora10g ~]# ifconfig  -a


eth0      Link encap:Ethernet  HWaddr 00:0C:29:A8:9E:CE
발급받은 라이센스는 My page-My License 에서 확인 할 수 있다.
-설치 시작-
1. OS 유저 생성
ALTIBASE를 사용 할 OS 유저를 생성하고 패스워드 설정을 수행한다.
[root@server1 ~]# groupadd dba

[root@server1 ~]# useradd -d /altibase -g dba altibase

[root@server1 ~]# passwd altibase

Changing password for user altibase.

New UNIX password:

Retype new UNIX password:

passwd: all authentication tokens updated successfully.
2. ALTIBASE 설치파일 업로드
다운로드 받은 설치파일을 ALTIBASE 계정으로 업로드 하여 실행권한을 부여한뒤, ALTIBASE_HOME 디렉토리를 생성한다.
[altibase@server1 ~]$ chmod +x altibase-HDB-server-6.3.1.6.9-LINUX-X86-64bit-release.run

[altibase@server1 ~]$ mkdir altibase_home

[altibase@server1 ~]$ ls


altibase-HDB-server-6.3.1.6.9-LINUX-X86-64bit-release.run   altibase_home
3. 설치파일 실행
ALTIBASE 설치파일인 .run 파일을 실행한다. 실행 후 아래와 같이 진행한다.
설치중간 라이센스 입력 부분에서 설치전 발급받은 라이센스를 복사하여 붙여넣어준다.
[altibase@server1 ~]$ ./altibase-HDB-server-6.3.1.6.9-LINUX-X86-64bit-release.run

----------------------------------------------------------------------------

Welcome to the ALTIBASE HDB Server 6.3.1.6.9 setup wizard.


----------------------------------------------------------------------------

Installation Directory


Please specify the installation directory for ALTIBASE HDB Server 6.3.1.6.9


Installation directory [/altibase/altibase-HDB-server-6.3.1]: /altibase/altibase_home


Please select the installation type.


Installation type


[1] Patch: patch package install
[2] Full installation: full package install


Please choose an option [1] : 2


----------------------------------------------------------------------------

Pre-Installation Requirements for ALTIBASE HDB


It is first necessary to set your system environment to ensure that ALTIBASE HDB

will run properly. Before installing ALTIBASE HDB, the kernel parameter values

must be set using the root user account. The kernel parameter values may be

modified after installation; however, they must be set prior to starting

ALTIBASE HDB.


Please refer to the installation manual and pre_install.sh script file.

(pre_install.sh: '$Altibase_install_dir'/install/pre_install.sh)


================ LINUX ================

[ How to modify kernel parameter values ]


echo 512 32000 512 512 > /proc/sys/kernel/sem

echo 872415232 > /proc/sys/kernel/shmall


# shmall

If it is desired to use ALTIBASE HDB in shared memory mode, the value of

'shmall' must be set. This value determines the maximum size of an Altibase

database.


Press [Enter] to continue :

These values must be set in order for ALTIBASE HDB to operate properly.

They must be set such that they are suitable for the system configuration.


=====================================


Press [Enter] to continue : [ENTER]


----------------------------------------------------------------------------

ALTIBASE HDB Property Settings

Step 1: Basic Database Operation Properties


Database name [mydb]: mydb


ALTIBASE HDB connection port number (1024-65535)      [20300]: 20300


Maximum size of memory database


- MIN value: 16M (K = kB, M = MB, G = GB) [2G]: 2G


Buffer area size for caching disk-based database pages


- MIN value: 1M (K = kB, M = MB, G = GB) [128M]: 128M


Do you want to create a database after the installation process is complete?


[1] YES

[2] NO

Please choose an option [1] : 2


----------------------------------------------------------------------------

ALTIBASE HDB Property Settings

Step 3: Set Database Directories


Default disk database directory [/altibase/altibase_home/dbs]: [ENTER]


Memory database directory [/altibase/altibase_home/dbs]: [ENTER]


Archive log directory [/altibase/altibase_home/arch_logs]: [ENTER]


Transaction log directory [/altibase/altibase_home/logs]: [ENTER]


[Log Anchor file directories ]

ALTIBASE HDB maintains three sets of log anchor files. These files contain

important information

about the database. By default, they are located in the "logs" folder.

The location can be changed here or by modifying the contents of the ALTIBASE

HDB properties file,

which is named "altibase.properties".


Directory 1. [/altibase/altibase_home/logs]: [ENTER]


Directory 2. [/altibase/altibase_home/logs]: [ENTER]


Directory 3. [/altibase/altibase_home/logs]: [ENTER]


----------------------------------------------------------------------------

Property Review


Please check your property settings.


To change these properties after installation is complete,

please modify the following file:

  /altibase/altibase_home/conf/altibase.properties.


1. ALTIBASE HDB Property Settings:

    Step 1: Basic Database Operation Properties


    1) Database name:

         [mydb]


    2) ALTIBASE HDB connection port number (1024-65535):

         [20300]


    3) Maximum size of memory database:

         [2G]


    4) Buffer area size for caching disk-based database pages:

         [128M]


2. ALTIBASE HDB Property Settings:

Press [Enter] to continue :

    Step 2: Database Creation Properties


    # Nothing


3. ALTIBASE HDB Property Settings:

    Step 3: Set Database Directories


    The database will not operate properly if any of these directories are

removed.


    1) Disk database directory:

         [/altibase/altibase_home/dbs]


    2) Memory database directory:

         [/altibase/altibase_home/dbs]


    3) Archive log directory:

         [/altibase/altibase_home/arch_logs]


    4) Transaction log directory:

         [/altibase/altibase_home/logs]


    5) Log Anchor file directories:

Press [Enter] to continue :

         Directory 1:

         [/altibase/altibase_home/logs]


         Directory 2:

         [/altibase/altibase_home/logs]


         Directory 3:

         [/altibase/altibase_home/logs]


Press [Enter] to continue : [ENTER]


----------------------------------------------------------------------------

Setup is now ready to install ALTIBASE HDB Server 6.3.1.6.9.


Do you want to continue? [Y/n]: Y


----------------------------------------------------------------------------

Please wait until the setup wizard finishes installing ALTIBASE HDB Server

6.3.1.6.9.


 Installing

 0% ______________ 50% ______________ 100%

 #########################################


----------------------------------------------------------------------------

ALTIBASE HDB License


If a license has not been issued or if it has expired,

ALTIBASE HDB services will not start.


If this is the case, Please visit   http://support.altibase.com


Choose an option for ALTIBASE HDB license registration.


[1] I will input a license key.

[2] I will select a license file.

[3] I want to register an ALTIBASE HDB license later.

Please choose an option [1] : 1


----------------------------------------------------------------------------

ALTIBASE HDB License


Please enter your ALTIBASE HDB license key.


 []: 662650006ED763CEDB83C3AB5A384A28


----------------------------------------------------------------------------

ALTIBASE HDB Quick Setting Guide


[  Installation complete  ]

Please refer to the file listed below to verify the ALTIBASE HDB version.

    /altibase/altibase_home/APatch/patchinfo


[ Quick Guide to Making Settings in ALTIBASE HDB ]


1. Set kernel variables using the root user account.

    run the '/altibase/altibase_home/install/pre_install.sh' file

    - This script helps you make kernel parameter settings.


================ LINUX ================

[ How to modify kernel parameter values ]


echo 512 32000 512 512 > /proc/sys/kernel/sem

echo 872415232 > /proc/sys/kernel/shmall


# shmall

If it is desired to use ALTIBASE HDB in shared memory mode, the value of

'shmall' must be set. This value determines the maximum size of an Altibase

database.

Press [Enter] to continue : [ENTER]


These values must be set in order for ALTIBASE HDB to operate properly.

They must be set such that they are suitable for the system configuration.


=====================================


2. Provide a license.

    Please rename and locate the license file as shown below.

    /altibase/altibase_home/conf/license


    If no license file has been issued or if the license file has expired,

    ALTIBASE HDB services will not start.

    In this case, please visit http://support.altibase.com


3. Configure user environment variables (using the user account with which

ALTIBASE HDB was installed).

    Run the '/altibase/altibase_home/install/post_install.sh' file

    under the account with which ALTIBASE HDB was installed.


Press [Enter] to continue : [ENTER]

    This script performs necessary post-installation configuration.


    1) Create the ALTIBASE HDB user environment file and apply it to the user

profile.

         (/altibase/altibase_home/conf/altibase_user.env)

    2) Create a database.


         If you selected 'YES' in response to the question about whether to

create

         a database after installation, at "ALTIBASE HDB Property setting step

1",

         a database will be automatically created.


         If you selected 'NO' in response to this question,

         you need to create a database manually.


         shell> server create [DB Character Set] [National Character Set]


4. Start up and shut down the server

    shell> server start

    shell> server stop


Press [Enter] to continue : [ENTER]


5. Connect to the database using iSQL

    shell> isql -s 127.0.0.1 -u SYS -p MANAGER


Press [Enter] to continue : [ENTER]


----------------------------------------------------------------------------

Setup has finished installing the ALTIBASE HDB Server 6.3.1.6.9 on your host.


Info: [Linux Env.]

        Target : /altibase/altibase_home/conf/altibase_user.env


        created  ----------------------- Altibase environment setup file.

        added    ----------------------- ALTIBASE_HOME

        added    ----------------------- PATH

        added    ----------------------- LD_LIBRARY_PATH

        added    ----------------------- CLASSPATH


        export ----------------------- 'altibase_user.env'

        into '/altibase/.bash_profile'


==============================================

Please perform [re-login]

or [source /altibase/.bash_profile]

or [. /altibase/.bash_profile]

==============================================
4. altibase_user.env 수정 및 Profile 설정
설치 후 altibase_user.env 파일을 수정한다. 파일은 /altibase/altibase_home/conf 경로에 있으며 아래 굵게 표시된 구문을 추가하여준다.
[altibase@server1 ~]$ vi /altibase/altibase_home/conf/altibase_user.env
[altibase_user.env 파일내용]
ALTIBASE_HOME=/altibase/altibase_home;export ALTIBASE_HOME

PATH=${ALTIBASE_HOME}/bin:${PATH};export PATH

LD_LIBRARY_PATH=${ALTIBASE_HOME}/lib:${LD_LIBRARY_PATH};export LD_LIBRARY_PATH

CLASSPATH=${ALTIBASE_HOME}/lib/Altibase.jar:${CLASSPATH};export CLASSPATH

ALTIBASE_NLS_USE=MS949;export ALTIBASE_NLS_USE
수정을 완료하였으면 Path가 등록되도록 Profile을 재등록해준다.
[altibase@server1 ~]$ source .bash_profile

[altibase@server1 ~]$ echo $ALTIBASE_HOME

/altibase/altibase_home
우분투
source ~/.profile
5. 데이터베이스 생성
server 명령어를 이용하여 데이터베이스를 생성해준다. CHARACTER SET은 MS949로 설정하고 NATIONAL CHARACTER SET 은 UTF8로 설정하여 설치를 진행하고자 한다. 해당 명령어로 설치를 진행하면 noarchivelog mode로 설치가 진행되게 된다.
[altibase@server1 ~]$ server create MS949 UTF8

-----------------------------------------------------------------

     Altibase Client Query utility.

     Release Version 6.3.1.6.9

     Copyright 2000, ALTIBASE Corporation or its subsidiaries.

     All Rights Reserved.

-----------------------------------------------------------------

ISQL_CONNECTION = UNIX, SERVER = localhost

[ERR-910FB : Connected to idle instance]

Connecting to the DB server... Connected.


TRANSITION TO PHASE : PROCESS

Command executed successfully.


DB Info (Page Size     = 32768)

        (Page Count    = 257)

        (Total DB Size = 8421376)

        (DB File Size  = 1073741824)


        Creating MMDB FILES     [SUCCESS]


        Creating Catalog Tables [SUCCESS]


        Creating DRDB FILES     [SUCCESS]


  [SM] Rebuilding Indices [Total Count:0]  [SUCCESS]


DB Writing Completed. All Done.


Create success.
6. ALTIBASE 기동
server 명령어를 이용하여 기동한다.
[altibase@server1 ~]$ server start

-----------------------------------------------------------------

     Altibase Client Query utility.

     Release Version 6.3.1.6.9

     Copyright 2000, ALTIBASE Corporation or its subsidiaries.

     All Rights Reserved.

-----------------------------------------------------------------

ISQL_CONNECTION = UNIX, SERVER = localhost

[ERR-910FB : Connected to idle instance]

Connecting to the DB server... Connected.


TRANSITION TO PHASE : PROCESS


TRANSITION TO PHASE : CONTROL


TRANSITION TO PHASE : META

  [SM] Recovery Phase - 1 : Preparing Database

                          : Dynamic Memory Version => Parallel Loading

  [SM] Recovery Phase - 2 : Loading Database

  [SM] Recovery Phase - 3 : Skipping Recovery & Starting Threads...

                            Refining Disk Table

  [SM] Refine Memory Table : ......................................................................................................................... [SUCCESS]

  [SM] Rebuilding Indices [Total Count:134] ...................................................................................................................................... [SUCCESS]


TRANSITION TO PHASE : SERVICE

  [CM] Listener started : TCP on port 20300 [IPV4]

  [CM] Listener started : UNIX

  [CM] Listener started : IPC

  [RP] Initialization : [PASS]


--- STARTUP Process SUCCESS ---

Command executed successfully.
7. 서비스 정상 작동 확인
ALTIBASE의 Process, Listener Port, 딕셔너리 테이블 등이 정상적으로 출력되는지 확인한다.
[프로세스 확인]
[altibase@server1 ~]$ ps -ef | grep 'altibase -p'

altibase  4280     1  0 13:15 ?        00:00:00 /altibase/altibase_home/bin/altibase -p boot from admin


[포트오픈 확인]

[altibase@server1 ~]$ netstat -an | grep 20300

tcp        0      0 0.0.0.0:20300               0.0.0.0:*                   LISTEN


[딕셔너리 테이블 확인]

[altibase@server1 ~]$ is

-----------------------------------------------------------------

     Altibase Client Query utility.

     Release Version 6.3.1.6.9

     Copyright 2000, ALTIBASE Corporation or its subsidiaries.

     All Rights Reserved.

-----------------------------------------------------------------

ISQL_CONNECTION = TCP, SERVER = localhost, PORT_NO = 20300

iSQL> select * from tab;

USER NAME                                TABLE NAME                               TYPE

--------------------------------------------------------------------------------------

SYSTEM_                                  STO_COLUMNS_                             SYSTEM TABLE

SYSTEM_                                  STO_DATUMS_                              SYSTEM TABLE

SYSTEM_                                  STO_ELLIPSOIDS_                          SYSTEM TABLE

SYSTEM_                                  STO_GEOCCS_                              SYSTEM TABLE

SYSTEM_                                  STO_GEOGCS_                              SYSTEM TABLE

SYSTEM_                                  STO_PRIMEMS_                             SYSTEM TABLE

SYSTEM_                                  STO_PROJCS_                              SYSTEM TABLE

SYSTEM_                                  STO_PROJECTIONS_                         SYSTEM TABLE

SYSTEM_                                  STO_SRS_                                 SYSTEM TABLE

SYSTEM_                                  STO_USER_COLUMNS_                        SYSTEM TABLE

SYSTEM_                                  SYS_AUDIT_                               SYSTEM TABLE

SYSTEM_                                  SYS_AUDIT_ALL_OPTS_                      SYSTEM TABLE

...........
[쿼리 정상작동 확인]
iSQL> select sysdate from dual;

SYSDATE

---------------

18-NOV-2016

1 row selected.
출처: http://anyinstaller.tistory.com/3 [잡다한 Installer]
8. 우분투에서 20300 방화 포트 열기
센토스 인경우 마카로닉스 사이트에서 리눅스 에 검색해서 보면 된다.
ufw 상태 보기
아래 명령으로 ufw 상태를 확인한다. 기본값은 inactive로 되어 있다.
# ufw status verbose
Status: inactive
ufw 활성화 시키기, 상태 재 확인
enable, disable을 사용하여 ufw를 활성화, 비활성화 시킬 수 있다.
# ufw enable
Command may disrupt existing ssh connections. Proceed with operation (y|n)? y
Firewall is active and enabled on system startup


# ufw status verbose


Status: active


Logging: on (low)

Default: deny (incoming), allow (outgoing)

New profiles: skip
ALLOW, DENY 설정
허용
허용에 대한 구문은 아래와 같다.
sudo ufw allow <port>/<optional: protocol>
예를 들어 tcp, udp 53번 인바운드에 대해 허용하고 싶다면 아래와 같이 한다.
# ufw allow 20300
Rule added
tcp 20300, 또는 udp 20300에 대해 각각 설정하고자 한다면 아래와 같이 하면 된다.
# ufw allow 20300/tcp

# ufw allow 20300/udp
거부
거부에 대한 구문은 아래와 같다.
sudo ufw deny <port>/<optional: protocol>
allow와 마찬가지이다. 즉 위의 allow 부분에 deny로 대체하면 된다. 설명은 생략
디폴트 값으로 모두 막기, 모두 허용하기
ufw default deny(allow)
서비스 이름으로 허용, 거부하기
ufw allow(deny) <service name>

예) # ufw allow ssh
1. alter user 명령어 수행
알티베이스 서버에 sys 유저로 접속 후 alter user 명령어로 패스워드를 변경합니다.
ALTER USER sys IDENTIFIED BY "new_password";
2. altipasswd 수행
알티베이스 서버 온라인 상태에서 수행합니다.
altipasswd 수행 예
$ altipasswd

Previous Password : old_password

New Password : new_password

Retype New Password : new_password

altipasswd 는...
Icon
- 알티베이스 서버가 shutdown 상태에서는 syspassword 파일을 참고하여 sys 계정의 패스워드를 체크합니다.
- altipasswd 를 수행하면 syspassword 파일 변경됩니다. 이 파일은 $ALTIBASE_HOME/conf 디렉토리 아래에 있습니다.
9. altibase 데이터베이스의 시스템 아이디와 비번 그리고 변경 방법
ID : sys
password : manager
1. alter user 명령어 수행
알티베이스 서버에 sys 유저로 접속 후 alter user 명령어로 패스워드를 변경합니다.
ALTER USER sys IDENTIFIED BY "new_password";
2. altipasswd 수행
알티베이스 서버 온라인 상태에서 수행합니다.
altipasswd 수행 예
$ altipasswd
Previous Password : old_password
New Password : new_password
Retype New Password : new_password
3. sys 패스워드가 포함된 스크립트 수정
아래 세 개 스크립트에는 sys 패스워드가 포함되어 있습니다.
그래서 sys 패스워드 변경 시 이 스크립트들도 수정해야 합니다.
server 스크립트
$ALTIBASE_HOME/bin/server 스크립트에서 -p 옵션 뒤의 패스워드를 새 패스워드로 변경합니다.
$ cd $ALTIBASE_HOME/bin
$ vi server
ADMIN="${ALTIBASE_HOME}/bin/isql -u sys -p manager -sysdba -noprompt"
ISQL="${ALTIBASE_HOME}/bin/isql -s localhost -u sys -p manager -silent"
is 스크립트
$ALTIBASE_HOME/bin/is 스크립트에서 -p 옵션 뒤의 패스워드를 새 패스워드로 변경합니다.$ cd $ALTIBASE_HOME/bin
$ vi is
${ALTIBASE_HOME}/bin/isql -s localhost -u sys -p manager $*
il 스크립트
$ALTIBASE_HOME/bin/il 스크립트에서 -p 옵션 뒤의 패스워드를 새 패스워드로 변경합니다.
$ cd $ALTIBASE_HOME/bin
$ vi il
${ALTIBASE_HOME}/bin/iloader -S localhost -U SYS -P MANAGER $*
문제해결
server start 시 "Invalid password" 에러 발생할 경우 조치방법
$ALTIBASE_HOME/bin/server 스크립트를 열어서 아래 부분에 변경한 패스워드로 수정되었는지 확인한다.
ADMIN="${ALTIBASE_HOME}/bin/isql -u sys -p manager -sysdba -noprompt" ISQL="${ALTIBASE_HOME}/bin/isql -s localhost -u sys -p manager-silent"
- 위 a는 변경한 패스워드로 적용되어 있는데도 invalid password 에러가 발생한다면 alter user 명령어로만 sys의 패스워드를 변경하고 altipasswd는 실행하지 않았을 가능성이 있다.
이때는 altipasswd를 수행하여 변경한 패스워드를 적용해준 후 server start를 시도한다.
2. 클라이언트 설치
다운받은 후 그냥 yes 만 하면 된다.
기본값을 변경하지 않았으면
userid : sys
pasword :manager
3. Altibase 에서 제공하는 툴 설치
http://www.gurubee.net/lecture/2161
4. Altibase 오렌지 툴 설치
http://www.warevalley.com/xml/download/orange_view?num=81&page=1&type=trial


댓글 ( 4)
댓글 남기기