500
No
class MainActivity
package org.androidtown.mymultitouch;

import android.support.v7.app.AppCompatActivity;
import android.os.Bundle;

public class MainActivity extends AppCompatActivity {

    @Override
    protected void onCreate(Bundle savedInstanceState) {
        super.onCreate(savedInstanceState);
        setContentView(R.layout.activity_main);
    }
}
R.layout.activity_main
<?xml version="1.0" encoding="utf-8"?>
<RelativeLayout xmlns:android="http://schemas.android.com/apk/res/android"
xmlns:tools="http://schemas.android.com/tools"
android:id="@+id/activity_main"
android:layout_width="match_parent"
android:layout_height="match_parent"
android:paddingBottom="@dimen/activity_vertical_margin"
android:paddingLeft="@dimen/activity_horizontal_margin"
android:paddingRight="@dimen/activity_horizontal_margin"
android:paddingTop="@dimen/activity_vertical_margin"
tools:context="org.androidtown.mymultitouch.MainActivity">
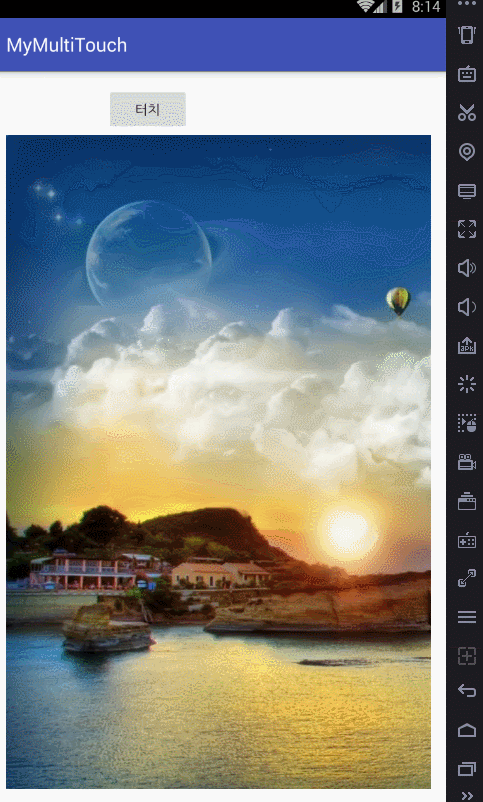
<Button
android:text="터치"
android:layout_width="wrap_content"
android:layout_height="wrap_content"
android:layout_alignParentTop="true"
android:layout_alignParentLeft="true"
android:layout_alignParentStart="true"
android:layout_marginLeft="105dp"
android:layout_marginStart="105dp"
android:id="@+id/button" />
<org.androidtown.mymultitouch.MyView
android:text="Button"
android:layout_width="match_parent"
android:layout_height="wrap_content"
android:layout_below="@+id/button"
android:id="@+id/button2"
android:layout_alignParentLeft="true"
android:layout_alignParentStart="true"
android:layout_alignParentBottom="true"
android:background="#ffbbccee"
/>
</RelativeLayout>
class MyView
package org.androidtown.mymultitouch;

import android.content.Context;
import android.content.res.Resources;
import android.graphics.Bitmap;
import android.graphics.BitmapFactory;
import android.graphics.Canvas;
import android.graphics.Color;
import android.graphics.Paint;
import android.util.AttributeSet;
import android.util.Log;
import android.view.MotionEvent;
import android.view.View;

/**
 * Created by choi on 2017-04-09.
 */

public class MyView extends View {

    private final static String TAG="MyView";

    float curX1, curY1, curX2 ,curY2;

    float oldX1, oldY1, oldX2 ,oldY2;

    float diffX1, diffY1;

    Bitmap  bitmap, mBitmap;
    Canvas mCanvas;// 메모리상 : m 으로 앞글자에 변수지정
    Paint paint;

    //더블 버퍼링 - 메모리상 이미지를 생성 후
    // 실제 이미지를 메모리상 이미지에  붙여서 보여주는 과정
    // 과정
    // 1. 이미지 객체를 BitmapFactory 로 불러온다.
    // 2. 메모리상의 Bitmap 메모리를 생성하여 1번의 이미지 객체를 메모리상에
    // 그려주어 실제로 보이게 한다.


    public MyView(Context context) {
        super(context);
        init(context);
    }

    public MyView(Context context, AttributeSet attrs) {
        super(context, attrs);
        init(context);
    }


    private void init(Context context){
        Resources res =context.getResources();
        // bitmap 에 사용할 수 있는 비트맵 이미지 객체 생성 호출
        bitmap = BitmapFactory.decodeResource(res, R.drawable.a1);

        //페인트 객체 한번만 생성할 수 있도록 init 에 설정
        paint =new Paint();
    }


    //화면의 크기가 정해 졌을 때 호출됨
    @Override
    protected void onSizeChanged(int w, int h, int oldw, int oldh) {

        //더블 버퍼링 이미지를 메모리에 갔다가 다시 보여주는 과정
        // 이미지 만들기 - 여기서는 메모리상의 가상 이미지 만드는 것이다.
        if(w > 0 && h>0){
            newImage(w, h);

            redraw();
        }

    }


    // 메모리에 가상 이미지 생성
    private void newImage(int w, int h){
        // Bitmap.Config.ARGB_8888 는 기본적인 컬러
        mBitmap = Bitmap.createBitmap(w, h, Bitmap.Config.ARGB_8888);
        // 그림을 그릴 수 있게 만들기
        mCanvas =new Canvas();
        mCanvas.setBitmap(mBitmap);
    }


    private  void redraw(){
        //하얀색으로 그린다.
        mCanvas.drawColor(Color.WHITE);
        mCanvas.drawBitmap(bitmap, diffX1, diffY1 , paint);
        // 여기까지는 아직 메모리상에 가상으로 생성 한것이다.

        invalidate();
    }

    // 실제로 그림을 그리는 메소드 onDraw
    @Override
    protected void onDraw(Canvas canvas) {
        // 메모리상 비트맵이 null 이 아니면
        if(mBitmap!=null){
            // 메모리에서 만들어진 mBitmap 그려준다.
            canvas.drawBitmap(mBitmap, 0, 0, null);
        }
    }


    @Override
    public boolean onTouchEvent(MotionEvent event) {
        int action =event.getAction();
         /*  한손가락인 경우
          float curX =event.getX();
            float curY=event.getY();
        */

        //두손가락인 경우
        int pointerCount =event.getPointerCount();
        curX1 =event.getX(0);
        curY1=event.getY(0);


        if(pointerCount > 1){
            curX2 =event.getX(1);
            curY2=event.getY(1);
        }


        //손가락을 터치했을 때의 정보
        if(action==MotionEvent.ACTION_DOWN){

            Log.d(TAG, "손가락이 눌렸습니다." +
                    pointerCount +" , " + curX1 +" , " +curY1 + " , " +curX2 + " , " +curY2);

            //손가락을 움직였을 때의 정보
        }else if(action==MotionEvent.ACTION_MOVE){
            Log.d(TAG, "손가락이 움직였습니다." +
                    pointerCount +" , " + curX1 +" , " +curY1 + " , " +curX2 + " , " +curY2);

            diffX1=curX1;
            diffY1=curY1 ;

            // redraw 화면을 다시 그린다. invalidate 호출되면 ondraw() 가 호출된다.
            //
            redraw();


            //손가락을 떼었을 때의 정보
        }else if(action==MotionEvent.ACTION_UP){
            Log.d(TAG, "손가락이 떼졌습니다." +
                    pointerCount +" , " + curX1 +" , " +curY1 + " , " +curX2 + " , " +curY2);

        }

        oldX1=curX1;
        oldY1=curY1;
        oldX2=curX2;
        oldY2=curY2;

        return true;
    }

}
66강
67강
68강


댓글 ( 4)
댓글 남기기