따라하며 배우는 리액트 A-Z
[프론트엔드, 웹 개발] 강의입니다.
이 강의를 통해 리액트 기초부터 중급까지 배우게 됩니다. 하나의 강의로 개념도 익히고 실습도 하며, 리액트를 위해 필요한 대부분의 지식을 한번에 습득할 수 있도록 만들었습니다.
✍️
이런 걸
배워요!
리액트
NextJS
타입스크립트
정적 사이트 자동 배포
도커
강의: https://www.inflearn.com/course/%EB%94%B0%EB%9D%BC%ED%95%98%EB%8A%94-%EB%A6%AC%EC%95%A1%ED%8A%B8#
강의 자료 : https://github.com/braverokmc79/DiagramPDF
소스 :
https://github.com/braverokmc79/react-button-app
[7]. Next.js와 TypeScript
76.TNext.js 란
강의:

$ npx create-next-app@latest ./ --typescript
√ Would you like to use ESLint with this project? ... No / Yes
√ Would you like to use `src/` directory with this project? ... No / Yes
√ Would you like to use experimental `app/` directory with this project? ... No / Yes
√ What import alias would you like configured? ... @/*
Creating a new Next.js app in F:\Study\React\nextjs-app.

Using npm.

Installing dependencies:
- react
- react-dom
- next
- @next/font
- typescript
- @types/react
- @types/node
- @types/react-dom
- eslint
- eslint-config-next
77.Next.js 기본 파일 구조
강의 :
https://www.inflearn.com/course/따라하는-리액트/unit/119923?tab=curriculum

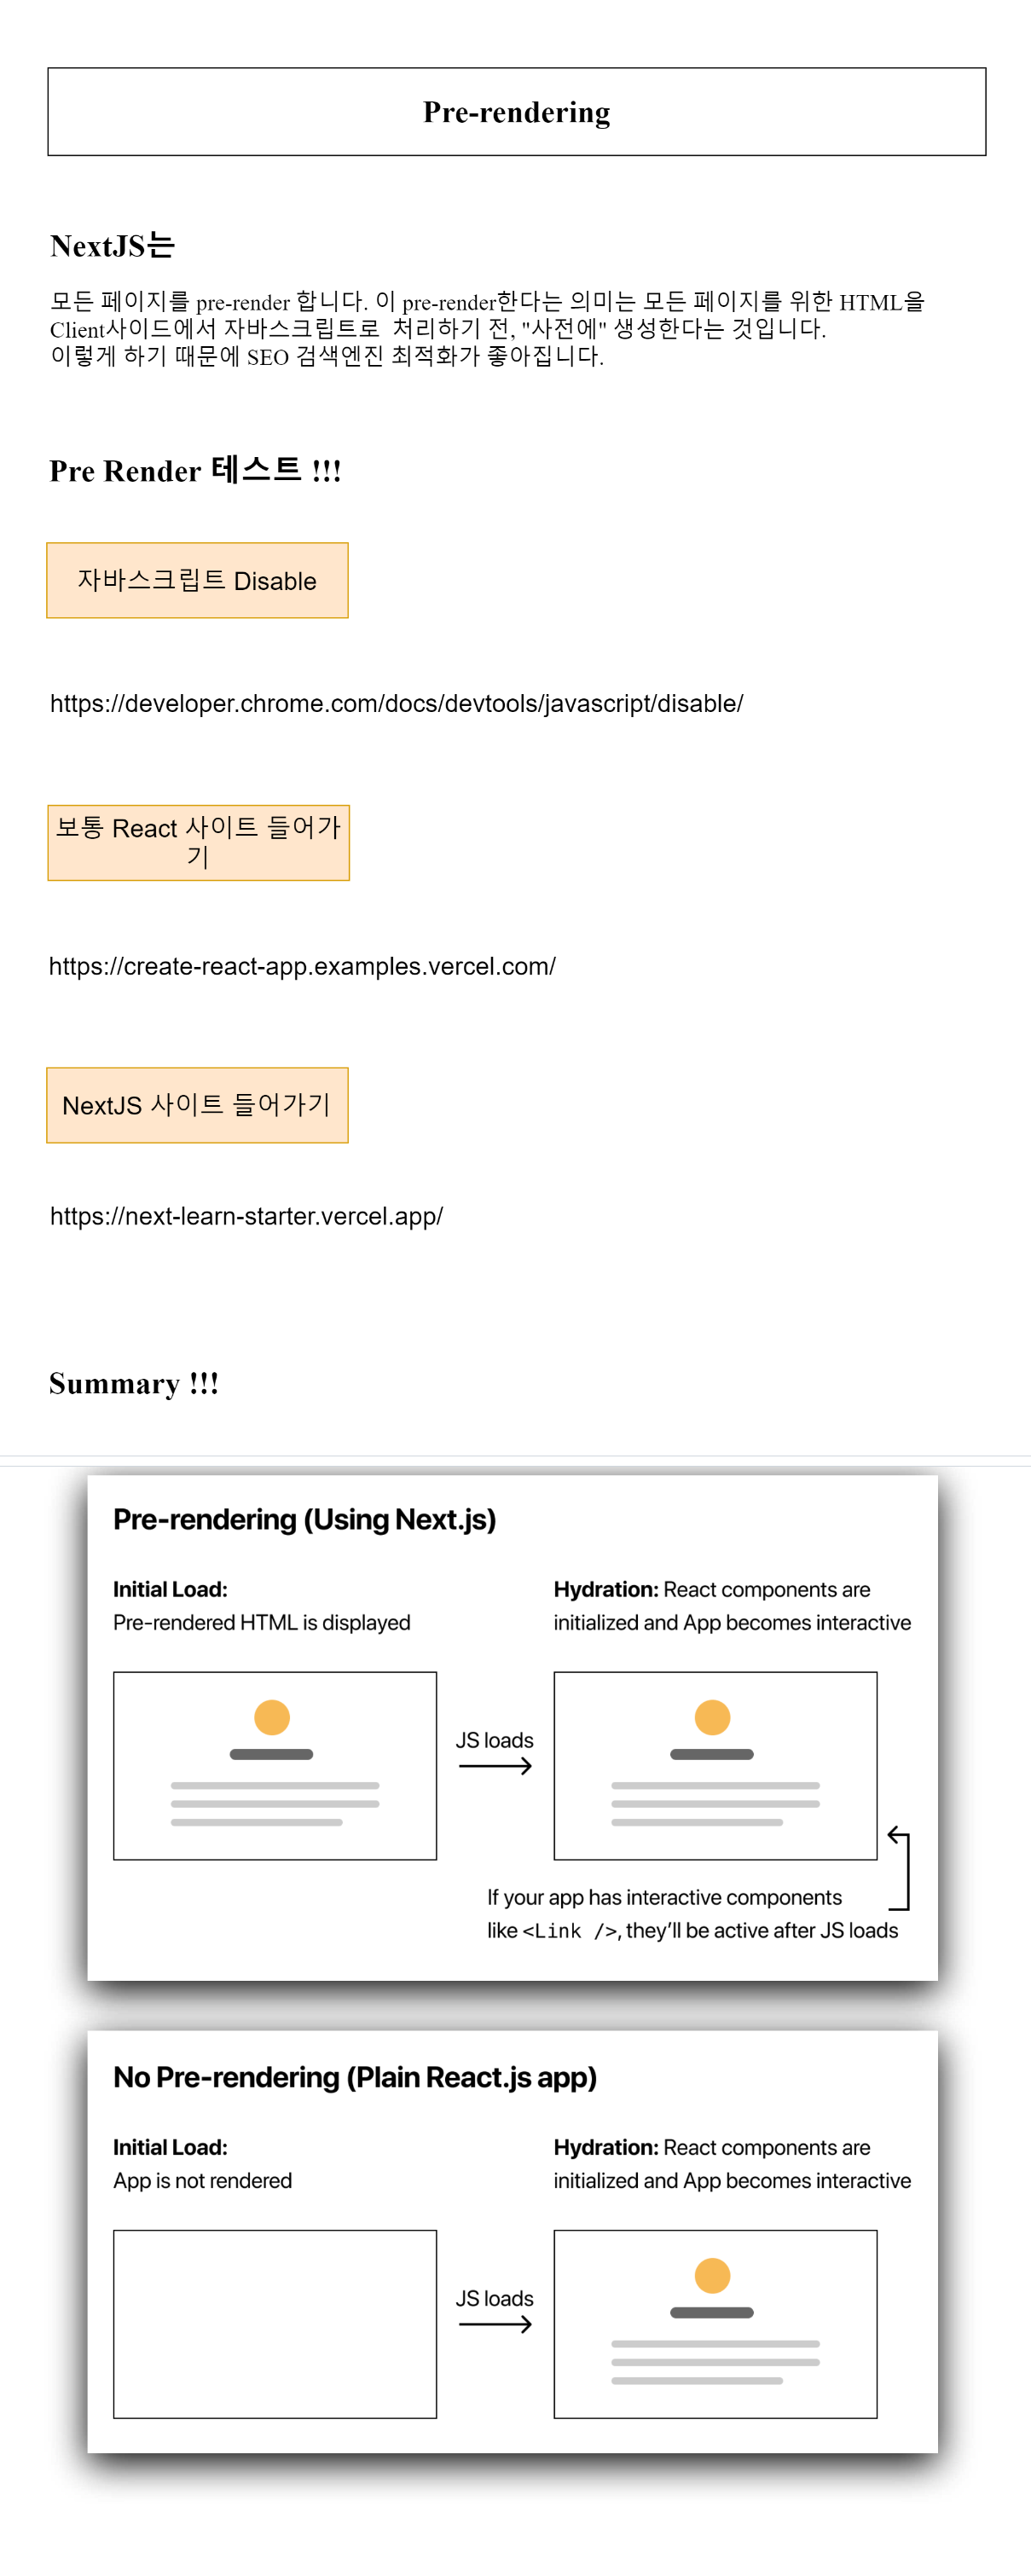
78.Pre-rendering
강의:
https://www.inflearn.com/course/따라하는-리액트/unit/119924?tab=curriculum
79.Data Fetching
강의 :
https://www.inflearn.com/course/따라하는-리액트/unit/119925?tab=curriculum

80.TypeScript 란?
강의 :
https://www.inflearn.com/course/따라하는-리액트/unit/119926?tab=curriculum

81.Next.js와 TypeScript 만들 앱 소개
강의 :
https://www.inflearn.com/course/따라하는-리액트/unit/119927?tab=curriculum

82.메인 페이지 UI 만들기(마크다운 파일 생성)
강의 :
https://www.inflearn.com/course/따라하는-리액트/unit/119928?tab=curriculum

index.tsx
import Head from 'next/head'
import Image from 'next/image'
import { Inter } from '@next/font/google'
import homeStyles from '@/styles/Home.module.css'

const inter = Inter({ subsets: ['latin'] })

export default function Home() {
  return (
    <>
      <Head>
        <title>JUNHO CHOI</title>
        <meta name="description" content="Generated by create next app" />
        <meta name="viewport" content="width=device-width, initial-scale=1" />
        <link rel="icon" href="/favicon.ico" />
      </Head>

      <section className={homeStyles.headingMd}>
        <p>[John Ahn Introduction]</p>
      </section>

      <section className={`${homeStyles.headingMd} ${homeStyles.padding1px}`}>
        <h2 className={homeStyles.headingLg}>Blog</h2>
        <ul className={homeStyles.list}>

        </ul>
      </section>


    </>
  )
}
styles/Home.module.css
.headingMd{
  font-size: 1.2rem;
  line-height: 1.5;
}

.padding1px{
  padding-top: 1px;
}


.headingLg{
  font-size: 1.5rem;
  line-height: 1.4;
  margin:1rem 0;
}

.list{
  list-style:none;
  padding:0 ;
  margin: 0;

}
posts/pre-rendering.md
---
title: "Two Forms of Pre-rendering"
date: "2020-01-01"
---

Next.js has two forms of pre-rendering: **Static Generation** and **Server-side Rendering**. The difference is in **when** it generates the HTML for a page.

- **Static Generation** is the pre-rendering method that generates the HTML at **build time**. The pre-rendered HTML is then _reused_ on each request.
- **Server-side Rendering** is the pre-rendering method that generates the HTML on **each request**.

Importantly, Next.js lets you **choose** which pre-rendering form to use for each page. You can create a "hybrid" Next.js app by using Static Generation for most pages and using Server-side Rendering for others.
posts/ssg-ssr.md
---
title: "When to Use Static Generation v.s. Server-side Rendering"
date: "2020-01-02"
---

We recommend using **Static Generation** (with and without data) whenever possible because your page can be built once and served by CDN, which makes it much faster than having a server render the page on every request.

You can use Static Generation for many types of pages, including:

- Marketing pages
- Blog posts
- E-commerce product listings
- Help and documentation

You should ask yourself: "Can I pre-render this page **ahead** of a user's request?" If the answer is yes, then you should choose Static Generation.

On the other hand, Static Generation is **not** a good idea if you cannot pre-render a page ahead of a user's request. Maybe your page shows frequently updated data, and the page content changes on every request.

In that case, you can use **Server-Side Rendering**. It will be slower, but the pre-rendered page will always be up-to-date. Or you can skip pre-rendering and use client-side JavaScript to populate data.
83.마크다운 파일을 데이터로 추출하기
강의 :
https://www.inflearn.com/course/따라하는-리액트/unit/119929?tab=curriculum

lib/getSortedPostedData
import fs from 'fs'
import path from 'path'
import matter from 'gray-matter'

const postsDirectory =path.join(process.cwd(), 'posts');

export  function getSortedPostsData(){
    console.log( " getSortedPostsData  ");

    // posts 파일 이름을 잡아주기
    const fileNames =fs.readdirSync(postsDirectory);
    //['pre-redndering.md' ,  ...]

    const allPostsData =fileNames.map(fileName => {
        const id=fileName.replace(/\.md$/, "");

        const fullPath =path.join(postsDirectory, fileName);
        const fileContents =fs.readFileSync(fullPath, 'utf-8');

        const matterResult =matter(fileContents);

        return{
            id,
            ...(matterResult.data as {data :string; title:string})
        }

    })

    console.log(allPostsData);
    return allPostsData.sort((a, b) =>{
            if(a.date <b.date){
                return 1;
            }else{
                return -1;
            }
    });


}
pages/index.tsx
import Head from 'next/head'
import { Inter } from '@next/font/google'
import homeStyles from '@/styles/Home.module.css'
import { GetStaticProps } from 'next'
import {getSortedPostsData} from "../../lib/post";


const inter = Inter({ subsets: ['latin'] })

export default function Home({ allPostsData }: {
  allPostsData: {
    date: string
    title: string
    id: string
  }[]
}) {


  console.log( " postValue 내용: " , allPostsData);

  return (
    <>
      <Head>
        <title>JUNHO CHOI</title>
        <meta name="description" content="Generated by create next app" />
        <meta name="viewport" content="width=device-width, initial-scale=1" />
        <link rel="icon" href="/favicon.ico" />
      </Head>

      <section className={homeStyles.headingMd}>
        <p>[Macaronics Introduction]</p>
      </section>

      <section className={`${homeStyles.headingMd} ${homeStyles.padding1px}`}>
        <h2 className={homeStyles.headingLg}>Blog</h2>
        <ul className={homeStyles.list}>

        </ul>
      </section>


    </>
  )
}


export const getStaticProps: GetStaticProps = async () => {
  console.log("getStaticProps ");
  const allPostsData = getSortedPostsData()
  return {
    props: {
      allPostsData
    }
  }
}


댓글 ( 4)
댓글 남기기